Name: Whiskey Barrel & Gotham
Layout designer: M.C. Fujiwara
Scale: N (1:160)
Size: 2 x 4 feet
Prototype: freelanced
Locale: mountain railroading
Era: 1900 to 1970s
Style: island or shelf
Mainline run: 9 feet
Minimum radius: 9-3/4″
Minimum turnout: no. 4
Maximum grade: none
Originally appeared in the September 2012 issue of Model Railroader.


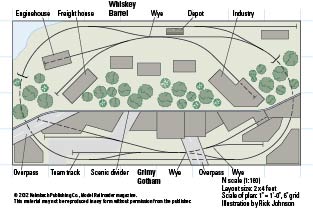



Thanks. Looks to make a great starter layout! Do you by any chance a more detail drawing showing where the different pieces of track are used?
I designed the layout with Atlas Code 80 sectional track & short turnouts.
Here's a list of sections, with the last number the quantity:
2500, N Atlas Code 80 2500. Flex 2 1/64". 1
2501, N Atlas Code 80 2501. Straight 4 7/8". 19
2509-2½, N Atlas Code 80 2509-2½. Straight 2 7/16". 9
2509-5/8, N Atlas Code 80 2509-5/8. Straight 39/64". 5
2510, N Atlas Code 80 2510. Curve radius 9 51/64", angle 30º 6
2511, N Atlas Code 80 2510. Curve radius 9 51/64", angle 15º 5
2515, N Atlas Code 80 2515. Curve radius 11 7/64", angle 30º (bulk) 4
2521, N Atlas Code 80 2521. Curve radius 11 7/64", angle 15º 2
2702, N Atlas Code 80 2702. Left turnout 4 7/8". (manual) 5
2703, N Atlas Code 80 2703. Right turnout 4 7/8". (manual) 5
2709, N Atlas Code 80 2709. Wye turnout 4 7/8". (manual) 3
That first piece of flextrack is actually just a straight cut down to that size, to fit between the right-hand straight and wye turnouts at the upper left.
I do not recommend using the surface remote switch machines, as 1) they look like coffins and 2) the track comes very close to the edge of the layout.
If you must go machine, under-surface-mount machines like the Atlas or Tortoise will be better, though a layout this size with no reach issues is a prime candidate for manual throws.
Remember that Atlas C80 turnouts have a plastic ("dead") frog, and so smaller steam and some short diesels have stalling issues through them.
One way to slightly increase the size of the layout is to add a frame of 1"x3"s or 1"x4"s to the outside edges of the 2'x4' panel: this will add 1 1/2" all way round, providing enough room for more scenery / buffer and even Kato Unitrack and their longer turnouts.
Thanks for all the positive feedback on the layout designs, and I look forward to seeing your layouts come to life!
The drawings should have a list of the tracks and parts used. this will make it easy to check what is available at home, and what needs to be procured.
This is specially so for beginners like me.
Thanks
It would be nice if there was an order list so that one could get exactly the right track to complete this layout.
I`m going to try this in ho scale hope it works.
Richard, Your idea of using one set of feeder wires for every other track section sounds good to me. I too am concerned about soldering wires to track with plastic ties.
Yea – a coffee table sized layout!
How are feeder wires connected, and at what intervals, on the Whiskey Barrel & Gotham? When using snap track some suggest a feeder connection for each section. Would a feeder at every other rail joiner work? (this would make one feeder, in effect, serve two sections of track) It is very difficult to avoid melting the plastic ties when trying to solder feeder wires to track rails.
Just my size…..