How To Twisting model trees from wire

Twisting model trees from wire

By Angela Cotey | March 9, 2020

| Last updated on November 3, 2020

A cheap and easy technique to make trees for your model railroad

Email Newsletter

Get the newest photos, videos, stories, and more from Trains.com brands. Sign-up for email today!

WireModelRailroadTrees_01
When he needed a few deciduous trees for his HO scale layout, Robert Pethoud turned to a tried-and-true method – hand-twisting armatures from florist’s wire. Coating the trunks in a mix of plaster and glue realistically simulates bark. All photos by Robert Pethoud.
WireModelRailroadTrees_02
Fig. 1 Big and small. Robert used 30AWG florist’s wire for the large HO scale tree at left; to make the Z scale tree, he used stranded copper electrical wire.
WireModelRailroadTrees_03
Fig. 2 Crossover. Instead of starting from the trunk, Robert starts at the tips of the branches, twisting just two wires together. He then twists those bundles together to make larger branches and works his way down.
WireModelRailroadTrees_04
Fig. 3 Bare wire. This is what an armature looks like before applying the bark coating. Robert finds 32 strands of wire is about as many as can be twisted easily by hand without needing protective gloves.
WireModelRailroadTrees_05
Fig. 4 Bark added. After covering the armature in several coats of a mix of white glue, powder paint, and plaster, the twisted-wire texture of the trunk and limbs is sufficiently concealed.
WireModelRailroadTrees_06
Fig. 5 Getting your fiber. Robert uses Woodland Scenics Poly Fibre to represent the fine branches and twigs of the tree canopy. This is the Z scale tree before applying foliage.
WireModelRailroadTrees_07
Fig. 6 Ready to plant. After having fine ground foam turf affixed to its Poly Fibre foliage with inexpensive hair spray, this tree is finished and ready to be planted on the layout

Nearly four decades of touring ­model railroads have led me to conclude that 90 percent of layouts with scenery (and 100 percent of those without it) would benefit from more trees. This lack of trees may be due to the common belief that realistic models either cost a good deal of money or are too much time and effort to build.

My HO scale Cascade Pacific, a port­able switching layout, sports scores of homemade conifers that were cheap, easy, and quick to make. But I was at a loss when it came to deciduous trees.

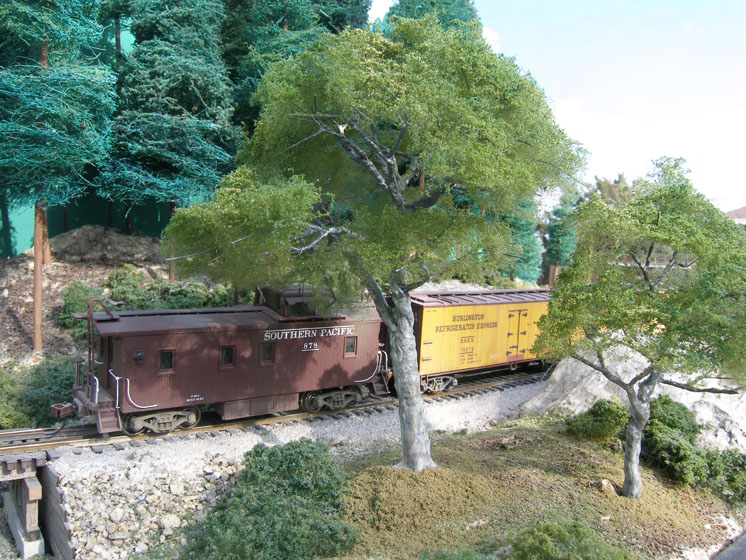
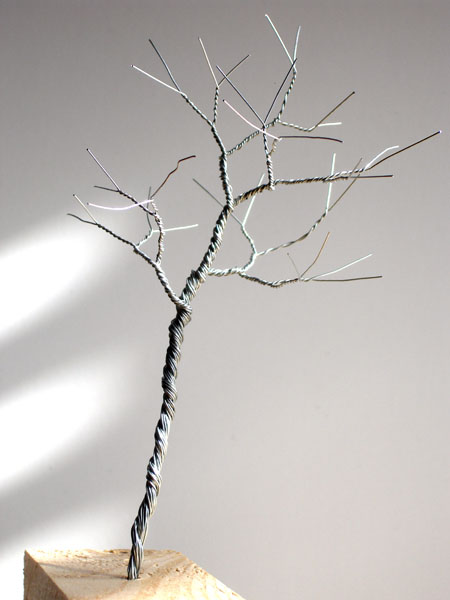
Since I only needed five or six of them, I decided to try an old technique that I expected to be tedious and time-consuming, even if inexpensive – twisting the armatures from wire. To my surprise, I found this turned out to be much quicker and easier than I anticipated. The photo above shows the results of a couple enjoyable hours at the workbench.

Bending the armatures

The items I used to construct the tree armatures shown in fig. 1 on the next page are given in the materials list. The trunk and limbs are formed from fine, soft wire. For the HO trees I used 30AWG florist’s wire from my local craft store. I bought the smallest diameter the store had, and it cost me less than $2 for a quarter pound, enough for dozens of miniature woody plants. For the Z scale tree I used stranded copper electrical wire, which turned out to have 16 strands, each smaller than 30 gauge. This smaller diameter wire would also work well for shrubs and saplings in HO and larger scales.

Begin by cutting a number of pieces of wire, all roughly the same length. For the Z scale tree I used 16 pieces, each about 2″ long. The large HO scale tree used 96 pieces, each 7″ in length. I also made a medium HO scale tree not shown in that picture; that armature took 32 pieces of florist’s wire, each about 5″ long.

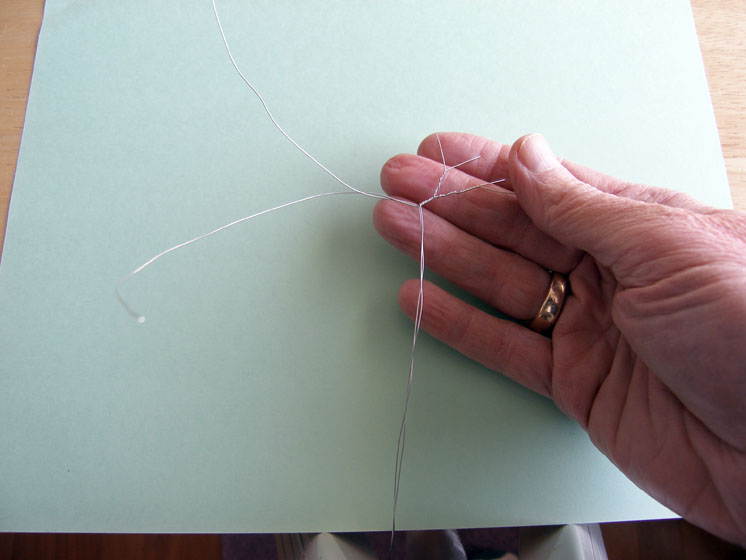
Here’s the trick to this method that works for me: rather than beginning with a trunk of dozens of wires, start from the outermost tips of the branches and twist the wires together to form larger and larger limbs, ending with the trunk. Take two lengths of wire and lay one over the other to form an X, with the crossing about 1⁄2″ from one end. Then twist the wires around each other a few times, and lay the little branch aside. ­Repeat for most of the rest of the wires.

Next, take two of your twisted branches, lay one over the other to form another X shape, and twist these branches­ together to form a larger limb made of four wires, as seen in fig. 2. Do this repeatedly, twisting together smaller branches into larger and larger bundles, and before long you’ll have an armature like that in fig. 3.

I find it easy enough to twist together 32 of the strands of florist’s wire by hand without gloves, but many more than that becomes challenging. For the large ­armature in fig. 1, I made three small trees of 32 strands each. I then wrapped the three trunks together with another length of wire. Where I thought the base of the trunk should be, I separated out several groups of strands and twisted them together to form roots. I left the strands in the middle of the trunk to form a mounting stem, which I’ll poke into the scenery to hold the tree in place.

Barking up the right tree

Up until this point, while the wires are still uncoated, you can bend your tree branches any way you like to form a pleasing and natural-looking shape. When you’re happy with the shape of the armature, it’s time to brush on the goop that will form the bark of the tree.

The bark goop I use is made from three ingredients: full strength white glue, plaster, and powder paint. I’ve tried both regular plaster of paris and Durham’s water putty; either one works well. Whatever you use, the goop mixture needs to be thick enough to conceal the texture of the twisted wire strands.

I don’t have a recipe with exact proportions; I just mix a small amount of black powder paint into a spoonful of plaster and then stir in enough white glue until it’s just thin enough to apply with a stiff brush. I store this mix in a small jar with a tight lid and it stays usable for days before drying out.

The first coat will soak into the wire strands and turn dark as the white glue base hardens and becomes clear. It took two coats on the Z scale armature, three on the small HO scale tree trunk, and five or six on the largest to cover the twisted-wire texture.

When the bark goop fully dries, you will have black armatures with metallic tips that look like something out of the ­movie “The Nightmare Before Christmas.” If that’s the effect you’re going for, you can stop there, but most of us will want to color the armatures. I painted mine with a can of gray spray primer from my local hardware store.

After that dried overnight, I drybrushed the trunk with acrylic craft paints. I used Craft Smart brown (no. 23628) and tan (no. 23626), as well as Apple Barrel dolphin gray (no. 20781). At this point, you have a decent looking leafless tree that would go well in a ­winter scene, like the one seen in fig. 4.
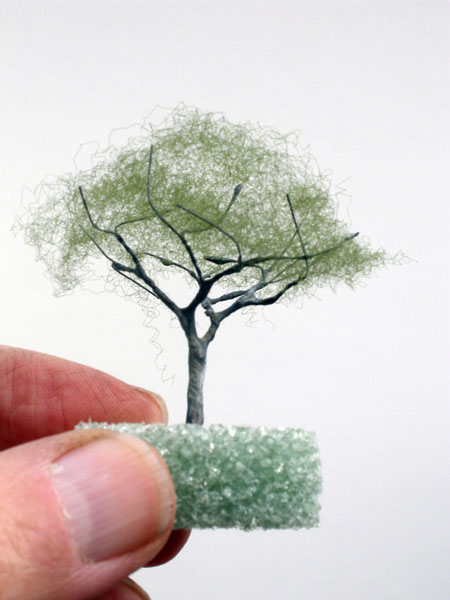
Adding foliage

Since 30AWG wire has a diameter of .01″, in HO scale our outermost armature twig tips represent branches almost a scale inch thick; in Z scale, they’re more than 2 scale inches thick. We need something much smaller to represent the smaller branches and twigs on ­deciduous trees. Woodland Scenics makes a product called Poly Fibre that works well for this. If you pull off a small piece of the material and then tease the fibers apart with your fingers, you end up with a fluffy tangle of fine green hairs that can be snagged on your armature branches to rather convincingly suggest thousands of twigs. Figure 5 shows what the Z scale tree looks like at this stage. It already looks more like a real tree than many commercial products.

After stringing as many of these foliage nets on your tree as you wish, you can fix them in place with a coating of hair spray. I use the least expensive brand I can find that’s both unscented and especially tacky (the can I bought says “extra super hold”). This spray is also used to glue the “leaves” in place.

To represent the leaves, I use fine turf from Woodland Scenics or JTT. While the hair spray is still wet from fixing the Poly Fibre in place, I sprinkle on some of the fine turf, just a pinch at a time. I use two or three shades of green, spraying another coat of hair spray between colors, and finish with some yellow fine turf for highlights. Figure 6 shows the completed tree, ready for planting.

Get twisting!

That’s all there is to it. A spool of wire, a pair of wire cutters, and a few pleasant hours of twisting and bending in front of the TV should give you sev­eral tree armatures. From start to finish, the large tree took roughly two hours of work, not counting drying time for bark goop and spray paint. A small HO tree took about half an hour, and the Z scale tree just 10 minutes or so.

This method is very versatile, and by varying the branch structure and bark color you should be able to represent many different types of trees, from ashes to willows. So what are you waiting for? Don’t you have several spots on your layout that could benefit from a rugged oak or a lithe sycamore?

Materials list

Various
30AWG florist’s wire
Hair spray
Plaster
Black powder paint
Acrylic craft paints
White glue

Woodland Scenics
Poly Fibre, green
Fine turf, assorted colors


You must login to submit a comment