For the last decade General Electric Evolution Series (GEVO) diesel locomotives have been a dominant force on Class 1 main lines, and increasingly in HO scale product lines. This latest HO GE ES44AC from MTH comes with a variety of user-controlled effects. Equipped with the firm’s Digital Command System, the model operates reliably on direct-current, Digital Command Control, and DCS layouts. A DCC-ready version is also available.
The prototype. Entering production in 2005, the GE ES44AC (Evolution Series 4,400 hp with alternating-current traction motors) was built to meet the United States Environmental Protection Agency’s strict Tier II emissions regulations. The locomotive’s GEVO 12-cylinder diesel engine produces as much horsepower as the 16-cylinder engine in the ES44AC’s predecessor, the AC4400CW, while providing greater fuel economy and fewer emissions.
The GE ES44AC and its variants are a mainline workhorse of today’s railroads. More than 3,700 Evolution Series diesels are in service around the world.
The model. The dimensions of the MTH model match prototype ES44AC drawings in the November 2004 Model Railroader. The remote-opening couplers are a scale foot longer than prototype measurements. User-installed Kadee- compatible non-remote couplers with shorter shanks are included.
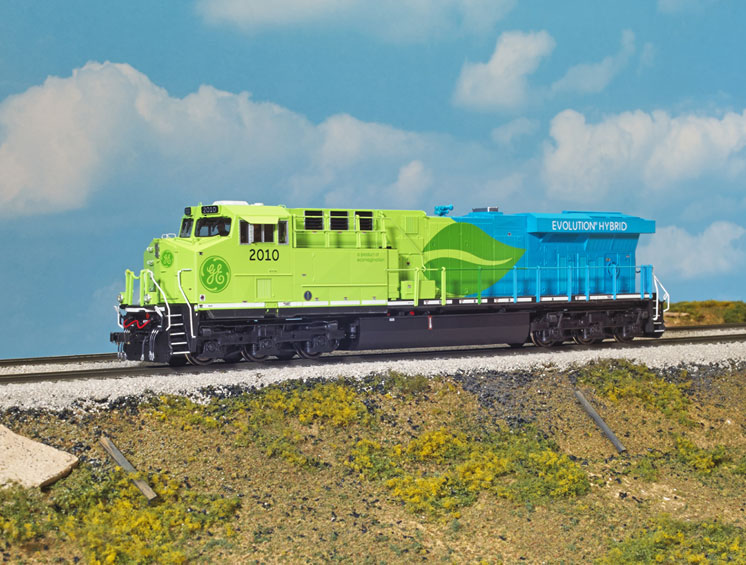
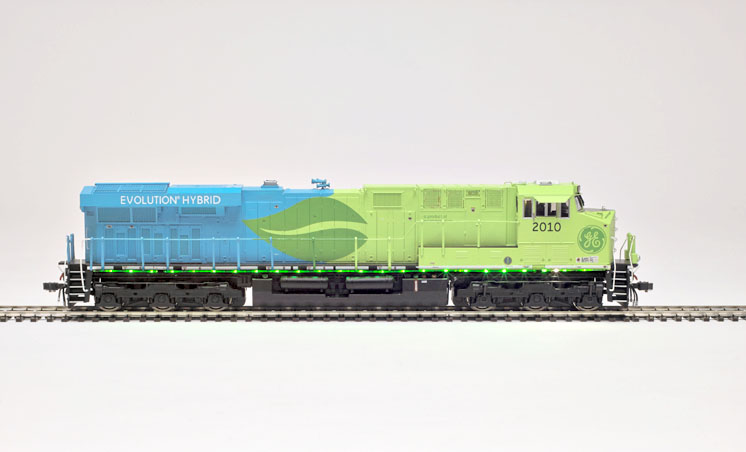
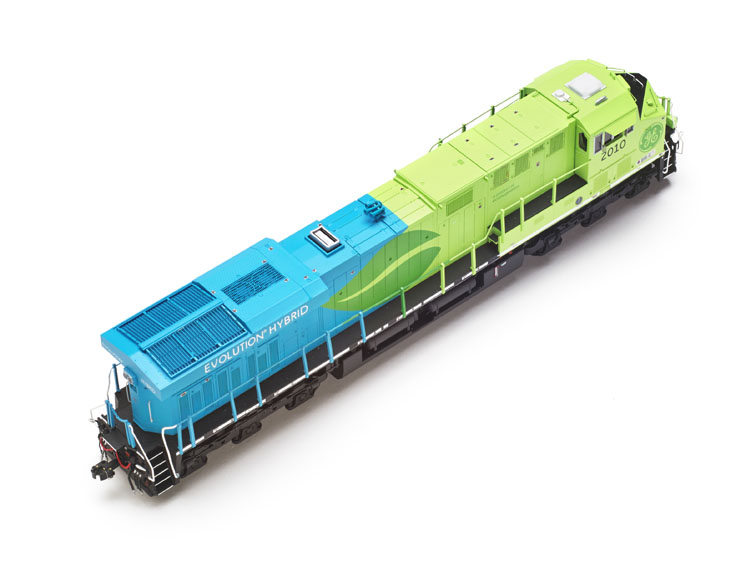
Our review sample is decorated as GECX no. 2010, which was rebuilt from original ES44AC demonstrator no. 2005 in 2007 to serve as the demonstrator for an Evolution Hybrid variant. This version operates like any other ES44AC but features on-board batteries that capture some of the energy dissipated during dynamic braking. Demonstrator no. 2010 has the same dimensions as an ES44AC, but there are some detail differences with the grill arrangement on the sides of the long hood. The MTH model has the grill arrangement found on in-production ES44AC locomotives, not the hybrid demonstrator.
The Evolution Hybrid paint scheme on the model features sharp color separation and matches prototype photos. Warning stencils and other paint details are properly placed, including the United States Department of Energy seal on both sides of the locomotive.
The model’s plastic body shell and truck sideframes feature sharply defined cast-in details. Separately applied plastic detail parts include the m.u. hoses, uncoupling levers, and brake wheel. The handrails, horn, and side intake grills are separate metal parts.
The locomotive cab is detailed with separate windshield wipers, sun shades, and rear view mirrors. Two painted crew figures occupy the interior.
DCC-ready versions of the ES44AC include instructions for removing the body shell by disengaging four locking tabs around the bottom of the fuel tank. I appreciated that it’s possible to remove the shell while keeping the couplers and lower sill assembly intact.
The mechanism is in the center of the chassis surrounded by a metal weight. The main printed-circuit board is atop the weight. The DCC-ready version includes an eight-pin socket for a DCC decoder. The DCS version has two .9″ (23mm) round speakers in the fuel tank.
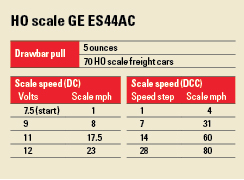
DCC and DCS. I tested the locomotive with several DCC systems, and it accelerated smoothly to a top speed of 80 scale mph. The prototype has a 75 mph top speed. Setting the DCC throttle to 128 speed steps offered much finer control, especially at low speed. Using this setting, the model crept along smoothly at 1 scale mph in speed step 1.
The DCS electronics support most of the programmable configuration variables (CVs) found on DCC decoders. The model can also be programmed on the main or on a programming track. I changed our review sample’s address to the locomotive cab number and added acceleration and deceleration momentum. A modeler can also program preset or custom speed tables.
The DCS board supports CVs 19, 21, 22, 23, and 24 for advance consist addresses, function controls, and consist momentum. I easily advance-consisted the MTH ES44AC with SoundTraxx and ESU LokSound DCC-equipped models.
Including the headlight, the ES44AC features 29 user-triggered functions. The horn blast and bell sounded like the prototypes I’ve heard when railfanning.
Function 4 triggers a four-part dialog/sound effect sequence that simulated an engine arriving and departing a yard. Functions 7 and 8 open the knuckles of the front and rear Proto-Couplers.
All of the functions can be remapped, which is especially useful for modelers with throttles that don’t support 28 functions. I remapped function buttons 3 and 4 so that I could manually notch the prime mover sounds independent of the locomotive speed.
To my ear, the ProtoSound 3.0 system accurately reproduced the GE prime mover sounds. Using function 6, I could easily adjust the master volume of the ProtoSound 3.0 system. The volume of the random crew dialog was too loud to be in scale with the other effects.
Although individual effect volume levels can’t be adjusted in DCC, I disabled the crew chatter by pressing function 27.
The headlights operate automatically according to the locomotive’s direction and dim when the locomotive stops. I couldn’t program the headlights for manual non-directional control.
Function 5 turns on the illuminated number boxes, the ditch lights, and cab interior light. The ditch lights are on only in the forward direction and flashed alternately when I sounded the horn. The cab interior light is on only when the locomotive is stopped.
Function 5 also turns on the hybrid demonstrator’s unique animated charging lights along the sills. The green lights chase outward when the locomotive is in motion and chase inward when the locomotive brakes or idles. On the prototype these lights were meant to call attention to the locomotive’s unique hybrid dynamic braking system.
I also ran the model with an MTH DCS system. Using this system I had all the functionality of running the model in DCC, and I could adjust the volume levels of individual sounds.
DC operation. On our DC test track the sounds and lights came on at 6V. When I advanced the throttle to 7.5V, the model showed off its impressive slow-speed control as it crawled along without any jerkiness at 1 scale mph.
Our standard speed tests, shown in the chart on the right, have a 12V maximum. The MTH model is designed for up to 24V, and at that voltage reached a top speed of 80 mph.
In DC the sound and light effects are automatic. The headlights, ditch lights, and dimmer operate according to direction. Engine rpm sounds increase or decrease according to the throttle setting. A quick decrease in throttle causes a squealing brake sound effect.
For those who model today’s railroads, a GEVO diesel is a necessity for an HO roster. With its array of lights and sounds and reliable operation, the MTH ES44AC is up to the task.
Manufacturer
MTH Electric Trains
7020 Columbia Gateway Dr.
Columbia, MD 21046-1532
www.mthhotrains.com
Era: 2005 to present
Road names: GE demonstrator no. 2010. Multiple road numbers: BNSF Ry., Canadian Pacific, CSX, Ferrosur, Kansas City Southern, Norfolk Southern, Union Pacific. NS heritage units: Central of Georgia, Conrail, Interstate, Lehigh Valley, Monongahela, Nickel Plate Road, Norfolk & Western, Norfolk Southern (pre-1982), Pennsylvania, Rock Island, Southern Ry.
Features
▪▪All-wheel drive and electrical pickup
▪▪Five-pole skew-wound flywheel-equipped motor
▪▪LED headlight, ditch lights, sill lights, and number boxes
▪▪Minimum radius: 18″
▪▪Remote-opening knuckle couplers at correct height (DCS version only)
▪▪RP-25 contour metal wheels, in gauge
▪▪User-installed Kadee-compatible knuckle couplers
▪▪Weight: 1 pound 4.4 ounces





Hello Roberto,
In order to use CVs 3 and 4, you need to first program CV52 to a value of 1. The default values for CVs 3, 4, and 52 are all 0. After setting CV52 to 1, you then can set CVs 3 and 4 to a value of 0 to 255, just like any other DCC decoder, to add momentum.
You can also tray using MTH's DCS momentum settings. To use these, you program CV52 to a value of 0. Then use CVs 53 (acceleration) and CVs 54 (deceleration to set momentum.
I prefer using CVs 3 and 4, since it's what I'm used to. I suggest trying both methods and seeing which gives you the best results for your model railroad.
Thanks for reading and best wishes,
Dana Kawala
Senior Editor
Model Railroader magazine
Dear Dana, you mentioned you added acceleration and deceleration momentum, I want to do so with my locomotive, I know that I have to change CV3 and CV4 but it would be very useful for me to know the default values of this variables (I cannot read dream in my MRC DCC system) can you please tell me those ?
So if I read this review correctly, if I run DC, and the speed at 12 volts is (just) 23 scale mph, that means I effectively cannot MU this model with other manufacturers GE's.