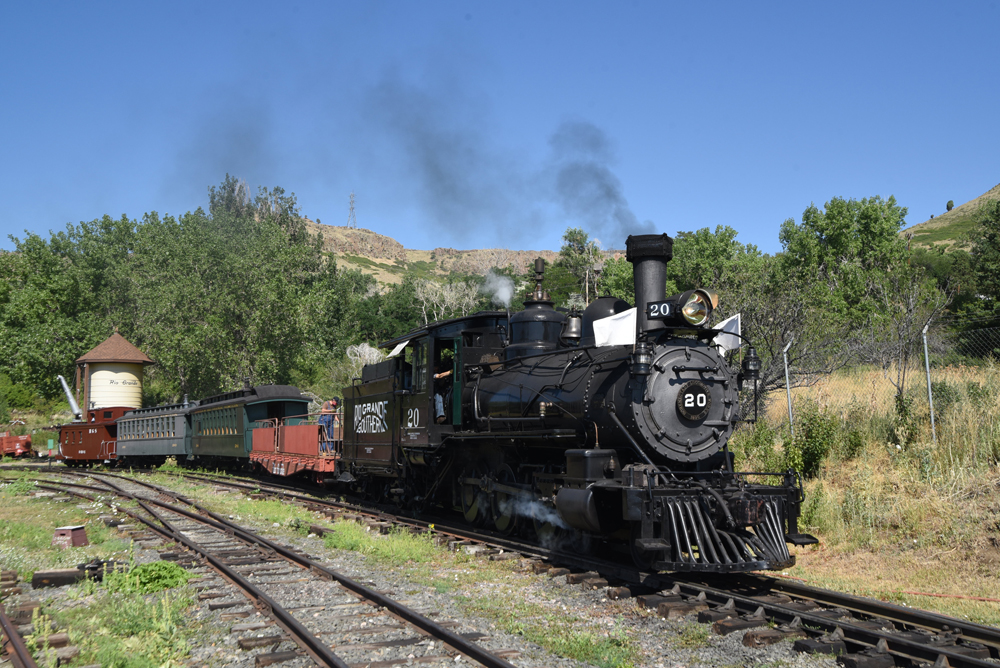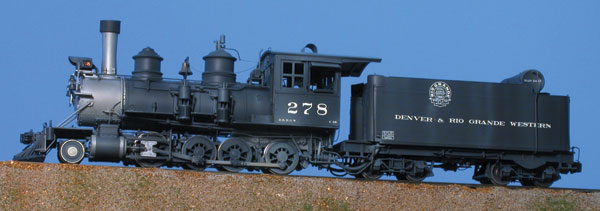
The Rio Grande’s C-16s were built between 1880 and 1882. Grant built 28 of the locomotives and 56 came from Baldwin. They served many years with 53 still on the roster in 1923, but by 1940 only four remained: nos. 223, 268, 271, and 278.
Like all steam engines, each C-16 became an individual and could change significantly year by year, thus the specificity of the kit’s date. That said, with minor changes the model can represent a much wider range of engines. The key to any such project is finding good photos. The most available sources are the R. Robb Narrow Gauge Pictorials, especially volumes I and XI, with XI having the best selection of no. 278.
The wheelsets match the National Model Railroad Association standards for gauge, but they have scale flanges which are smaller than the standard.
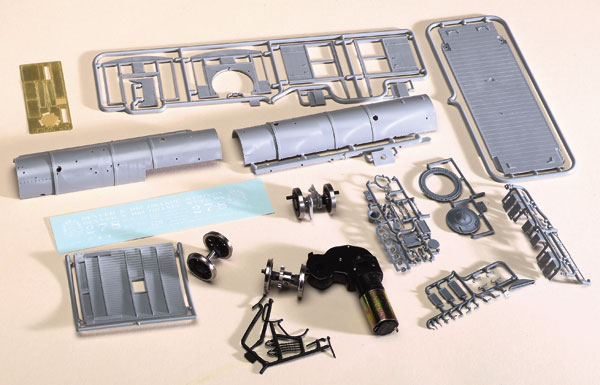
The 26-page instruction booklet consists mostly of exploded-view assembly drawings with a minimum of text. The first page includes six photos of a completed model. San Juan is printing these instructions as they produce the kits, so they’re including changes based on early feedback. Thus you may want to inquire about getting an updated set of instructions if you have an early kit.
The exploded views do a fine job of showing you what to do, but don’t rely on them entirely. Read the notes carefully and look for any other advisories. As with any complex kit, read all the way through first and keep looking ahead. Finally, work patiently, test-fit pieces, and think before you cement.
Most of the parts are superb castings, but cleaning up parting lines will make your model that much better. A fine file is best for this, but some lines may be more easily removed by shaving with a hobby knife.
Tender
The instructions begin with the tender, which familiarizes the builder with the kit before tackling the somewhat more difficult engine assembly. Note the tender shell is not removable once assembled. I substituted NorthWest Short Line metal wheelsets (no. 37843-4) so I could add pickups to the tender trucks for my sound system.
Two tender end beams are provided depending on whether you plan to use San Juan’s working scale couplers (included) or Kadee Magne-Matics.
Most of the piping on the tender must be bent from brass wire. By carefully following the bending templates, I wound up with piping that dropped into place. Some templates require close study to keep from missing a bend or bending it in the wrong direction.
My only real complaint involves the covers for the water valves on the water legs. These have a cast top, a cast rear wall, and a piece of .010″ styrene that you roll into shape. The problem is the L-shaped rear wall is not square because of its molding draft angle. My finished model looks okay, but I’m still not really happy with it.
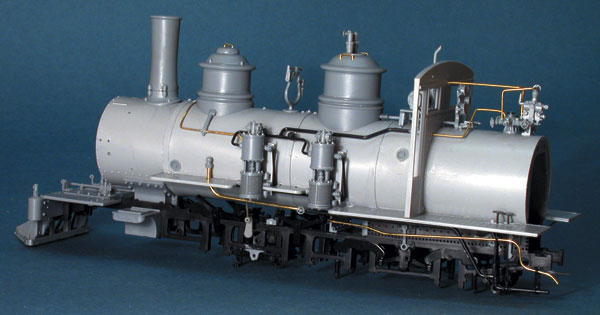
Engine frame
The next step after the tender is the engine frame. Though not difficult, this is the most critical aspect of the model. I had two bad parts in this assembly, which San Juan quickly replaced.
The equalization system on the side frames assembles easily, but you need to watch the parts orientation very carefully. Some parts are mirror images and it’s easy to try to pair-up the wrong combinations. Also note that the front springs (ones with notches) have an ejector pin on the top that must be removed.
When assembling the frame halves I suggest putting pieces of metal rod through the front and rear axle slots so you can get a quick visual confirmation that the assembly is square. Support the rods on identical height blocks and shift the frames forward and back until the rods are parallel to one another and square to the frames. I finished cementing mine before realizing there was no safeguard to ensure a square frame.
The etched current collectors are nice, but require you to bend them up. This is more critical than it first appears. Between the first and second drivers a portion of the collector is designed to help retain the equalizer links. I’d bent mine too close to the frame before I realized they were interfering with the equalizers.
As designed, the journal retainers are cemented in place, permanently fixing the drivers in the frame. I don’t like the idea of not being able to disassemble a mechanism, and if I build another I’ll drill the retainers and frames and use 00-90 screws to hold them in place.
Before adding the motor, gently push the completed frame assembly down the track. Push from behind or on the front coupler, not by pressing down on the frame. The drivers should move absolutely freely. If they hang up at all, look for and correct the bind.
Superstructure
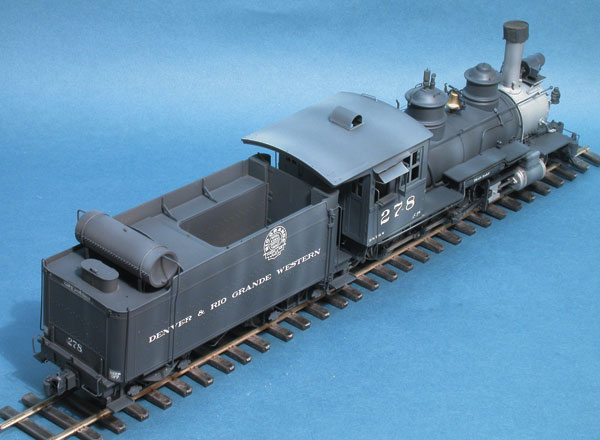
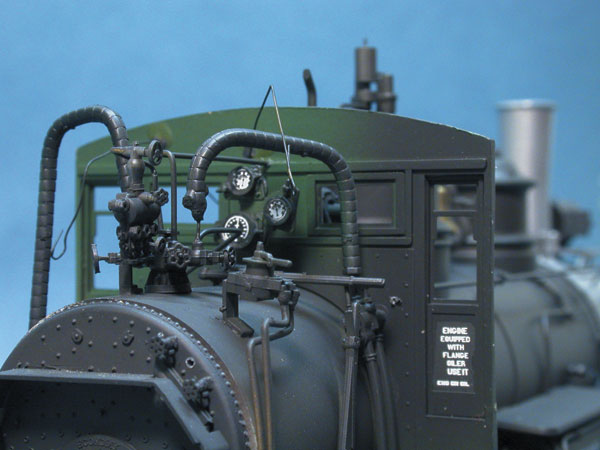
The superstructure of the engine goes together quite easily and the level of detail is excellent. Each air compressor consists of 15 pieces, bars in the pilot are all individual pieces, and cab interior detail (shown at right) is quite complete. Decals are included for the steam and air gauges and lettering for the inside of the doors.
The headlight is hollow and has a clear styrene lens and number boards. Decal number boards have “278” in clear against a black background if you’re going to install a light (not included). There are white “278s” if you don’t want to add a light.
I recommend using two Miniatronics 1.5-volt bulbs, one in the headlight reflector and the other in the number board area to keep the heat down. I’d also lightly sand the backs of the number boards to diffuse the light.
The classification lights are hollow with clear lenses; they’ll accept Miniatronics 1.2mm-diameter 1.5V bulbs, though I left them unlighted.
The completed engine and tender weighed 14.5 ounces. At full throttle top speed was about a scale 30 mph and minimum speed was a scale one mph. I lack Model Railroader’s sophisticated equipment to measure drawbar pull, but my engine was able to push 6.5 ounces of brass sitting on a piece of paper along the rails.
On3 modeler Dave Adams removed about a quarter of the boiler weight to lower tractive effort to a prototypical three to four cars and a caboose up his 3.8 percent grade. He says the modified engine easily handles a ten-to 12-car train on the flat. Speed and tractive effort therefore are excellent and appropriate for the prototype.
For DCC operation, I plan to use a North Coast Engineering DA-SR drop-in diesel decoder. It has a long, flat configuration and end tabs for headlight connections, convenient for this application. I’ll install a Soundtraxx sound-only decoder and speaker in the tender.
Price: $695.95
Manufacturer:
San Juan Car Co.
P. O. Box 1028
Durango, CO 81302
Description:
Plastic and metal locomotive kit
Features:
Cab interior detail
Directional headlights
Drawbar pull: 1.8 ounces
Enclosed spur gear drive
Engine weight: 14.5 ounces
Equalized frame
Faulhaber micro-motor
Minimum radius: 28″
San Juan Car Co. knuckle couplers
Scale-flanged drivers
Stainless steel driver tires
Performance:
On DCC the minimum speed was a scale one mph and the maximum was a scale 30 mph
Road name:
Denver & Rio Grande Western no. 278