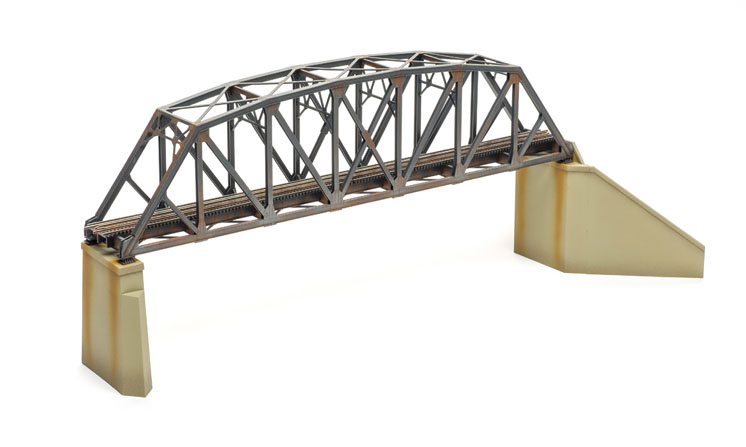
Wm. K. Walthers, which added easy-to-build HO scale railway bridges to its Cornerstone line a few years ago, is now doing the same in N scale. The single-track arched Pratt truss bridge kit is the latest in that line. I assembled and painted the bridge along with its matching pier and abutment kits, which are sold separately.
The bridge. The kit’s injection-molded styrene parts are made in a single color, a dark gray that simulates steel fairly well. The parts were molded well, with fine rivet and gusset detail and no flash to speak of.
The bridge is assembled in three main sub-assemblies: the two side truss panels and the interlocking girder floor and tie assembly. The side panels are each made from four pieces that are laminated back-to-back for better molded detail on both sides. The two long pieces on each side overlap at the “X”-braced panel in the middle, giving the sides increased strength and easier alignment. This leaves one visible seam on each side, but it’s not obtrusive.
Thin inserts with X-shaped texture meant to represent between-girder lacing go on top of the bottom chord of each side. They do the job of hiding the joints between the panel sides, but I wish they were see-through.
The stringer girders on the deck are notched to fit matching notches in the crossbearers. These parts fit tightly enough that they required minimal cement. I then glued the two tie strips end to end on top of the deck assembly and the bottom X-bracing underneath. If you’re building this kit, I advise leaving that piece (parts 19 and 20) until later, as there are alignment tabs that are hard to fit the side panels onto at the same time as tabs on the floor girders. Glue this piece on last.
I assembled the upper superstructure by attaching both side panels using the top laterals, vertical cross braces, and end laterals, but did not yet attach the deck. At this point I airbrushed both subassemblies Grimy Black and sprayed the tie deck Railroad Tie Brown. I then used cyanoacrylate adhesive (CA) to glue Atlas code 55 rail to the ties, glued the superstructure to the deck girders, and weathered the bridge with A.I.M. Products Light Rust weathering powder.
Abutments and piers. These two kits, molded in concrete-colored styrene, are much simpler structures and easy to build. The abutments have separately molded wings that can be placed at any angle to best fit your particular bridge location. The piers have optional cutwaters for use if installing in moving water. Both kits have score lines to guide shortening the parts, if needed; when assembled, the bearing surfaces on both stand 31⁄8″ high.
Both kits include parts for single- and double-track abutments or piers. I assembled one of each in about half an hour, counting painting time.
A bridge, not too far. At 14″ long, this kit builds into an impressive structure. Associate editor Eric White said he wishes this kit had been available when he kitbashed and scratchbuilt similar bridges for our N scale Canadian Canyons project layout. Maybe it will likewise fill a need on your N scale railroad.
Manufacturer
Wm. K. Walthers, Inc.
5601 W. Florist Ave.
Milwaukee, WI 53218
www.walthers.com
Era: mid-1840s to present
Features
• Cut lines for variable height (abutments and piers only)
• Injection-molded plastic kits
• Meets National Model Railroad Association clearance standards
• Tabs on ties for rail alignment (bridge only; rails not included)