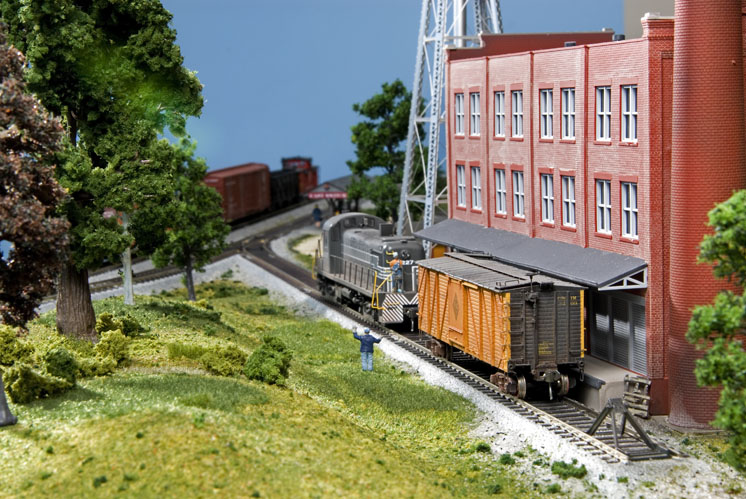
You may be surprised to find that the biggest part of building our HO Black River Junction project railroad wasn’t the benchwork, trackwork, or even wiring the layout for DCC. In the end, the scenery took the Model Railroader staff the most time to build.
Actually, once you stop and think about it, that fact shouldn’t come as much of a surprise. If you look at most any finished model railroad, or any real railroad for that matter, you’ll find that a relatively small percentage of it is taken up by the railroad itself. Instead, the larger portion of space is filled with the towns, industries, rivers, and hills that surround the trains.
Since the scenery work is such an important part of the building process, we’ll take the last two installments to cover it all. Cody Grivno and I will focus on the primary scenery features, those that need to go in before anything else. On the Black River Junction, those were the hills, roads, and river valleys.
Building hills
As you may remember from the January installment, we added an initial scenery layer by cementing a 1″ sheet of foam insulation board
on top of our benchwork. We then covered it with a Woodland Scenics vinyl grass mat before laying the track. While this gave us 32 square feet of instant green, the layout was much too flat to be realistic – even for central Ohio.
To break things up a bit, I decided to add some small hills to the staging-yard end of the layout. Using a sharp utility knife, I cut two crescent-shaped pieces of 1″ foam board, fitting them around the mainline track to form a cut. I then used the knife and a coarse sanding block to soften those cuts and round the edges to give the hills a natural shape. After vacuuming up the foam dust, I cemented the hills to the layout with PL300 construction adhesive. This is the same foam-safe adhesive made by Ohio Sealants, Inc., that we’ve used for many other projects on the layout.
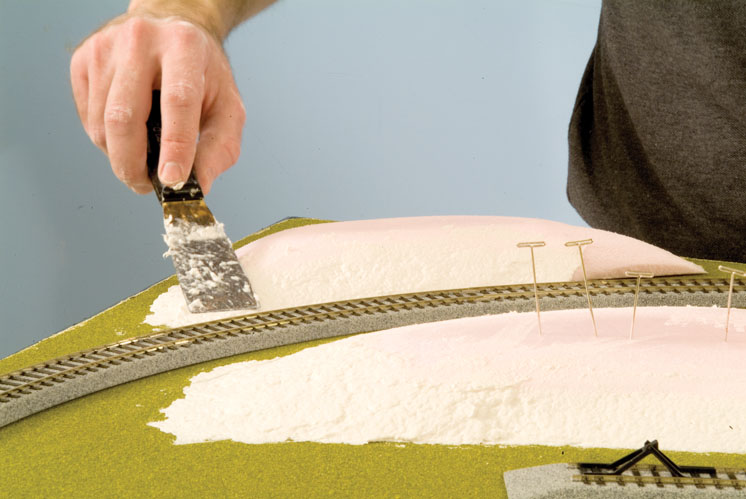
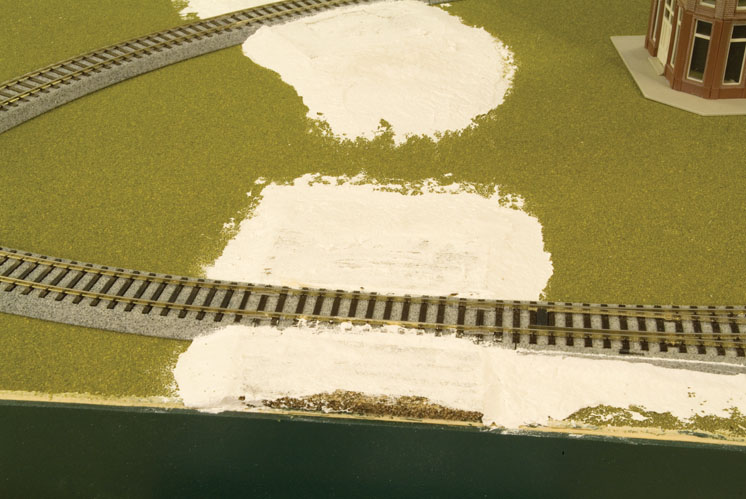
To speed up the process, I pinned the hills in place while the adhesive dried. Then I moved on to the next step – Sculptamold. This is a plaster-based papier-mache material that’s ideal for scenery work on layouts because it’s easy to use and makes little mess. I used the Sculptamold to blend the edges where the hills joined the layout, as shown in the top photo. I then let the hills dry overnight.
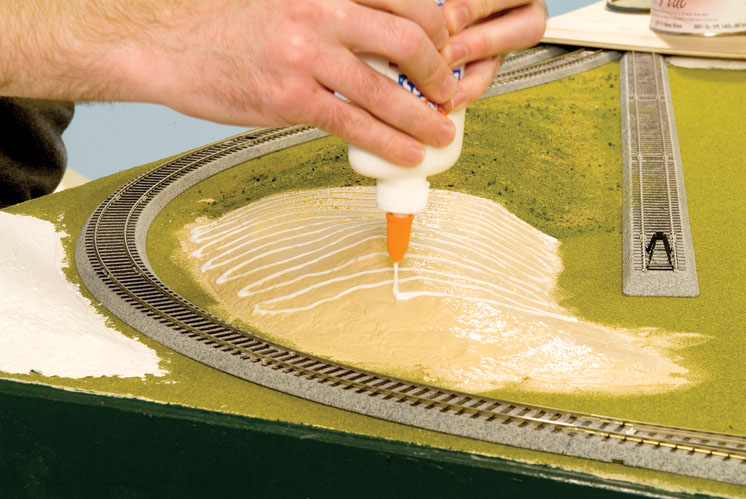
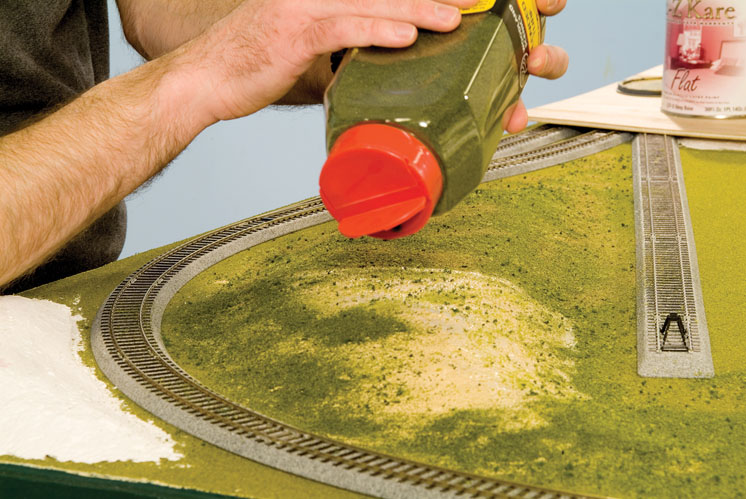
In the next step, I painted the hills with tan latex flat house paint. I then applied white glue directly on top of the wet paint (shown in the middle photo) and mixed the glue and paint together on the surface with my paintbrush. Next, I sifted Woodland Scenics green blended turf over the top, as shown in the lower photo. I also used several colors of coarse turf to represent weeds.
With the ground foam in place, I misted the hill with 70 percent rubbing alcohol and then used a pipette to dribble on some Woodland Scenics scenery cement. I let everything dry overnight. Later (as explained in the next installment), Cody came back and added some patches of static grass while senior editor Carl Swanson installed the trees. With that, the hills outside Black River were finished. – D.P.
Roadwork
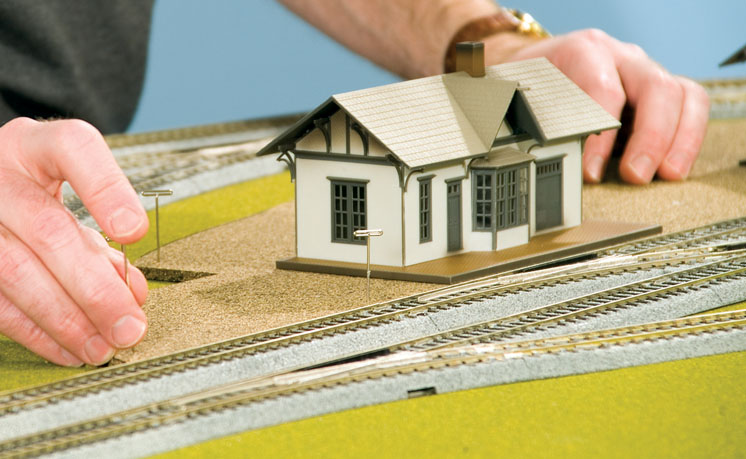
Before we could do much else with the scenery, we needed to install the roads and grade crossings. We began by test-fitting the buildings for our town and major industries so we’d know where to put the roads. We then lightly marked these locations on the layout with a black felt-tip marker.
As shown in the top photo, several buildings, including the foundry and the Baltimore & Ohio freight house and station, needed to be raised to track level. To do this we used 1⁄4″-thick HO sheet cork.
We cemented it to the layout with PL300 and pinned it in place until the adhesive dried.
David’s next project was the grade crossings. First, he used PL300 to attach pieces of cork sheet on both sides of the layout’s three grade crossings. While the construction adhesive was drying, David used Sculptamold to blend the cork into the rest of the layout, as shown in the middle photo.
Once the Sculptamold had dried, David used a medium-grit sanding block to sand the surface smooth. Because the road material is thin, any lumps or imperfections in the base scenery will be visible through the foam. Finally, David painted the Sculptamold with flat tan latex paint to blend it in with the base color of the grass mat.
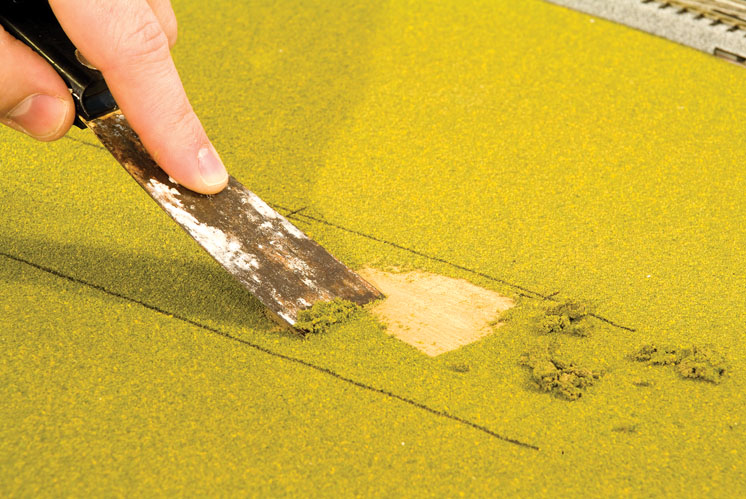
As David finished up the grade crossings, I started the roads. I sprayed the grass mat with 70 percent isopropyl alcohol following my pen marks for the roads. With the ground foam saturated, I used a putty knife to scrape away the scenery material, as shown in the middle photo. It’s important to thoroughly clean the foam out of these areas before placing the self-adhesive road sections.
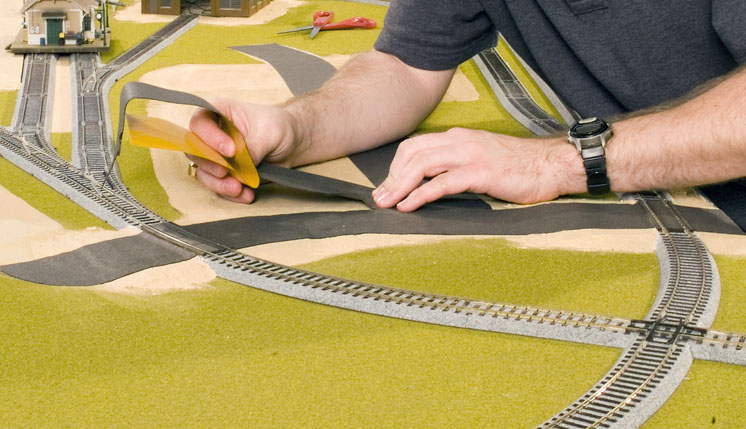
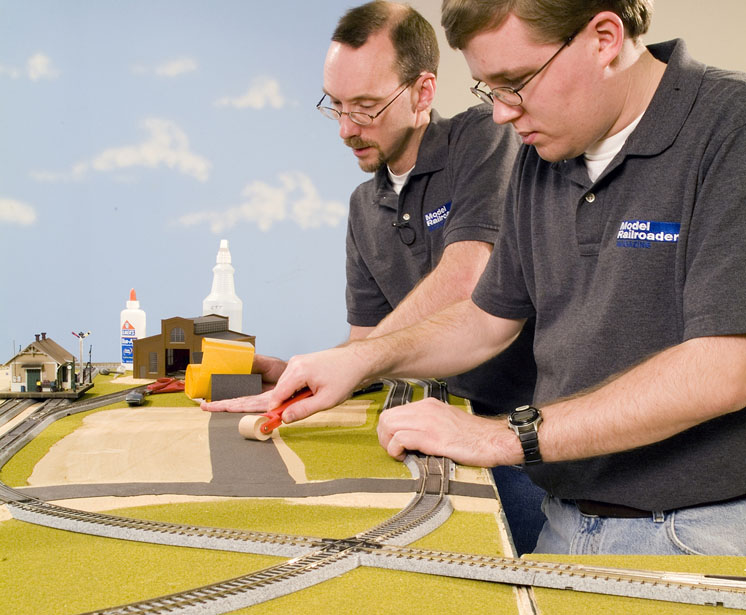
With the preliminary work out of the way, I attached Vollmer 6020 self-adhesive road material, as shown in the top photo on page 55. This product was easy to work with, and by pulling it carefully, I could bend it to follow curves in the road. As a word of caution, however, be aware that the self-adhesive road material is very sticky – once you attach the road to the layout, you can’t reposition it.
I found it easier to have an assistant help with the road project. As you can see in the middle photo, David attached the road material to the layout as I followed along with a wallpaper roller to smooth it out. We continued in this fashion all the way around the layout.
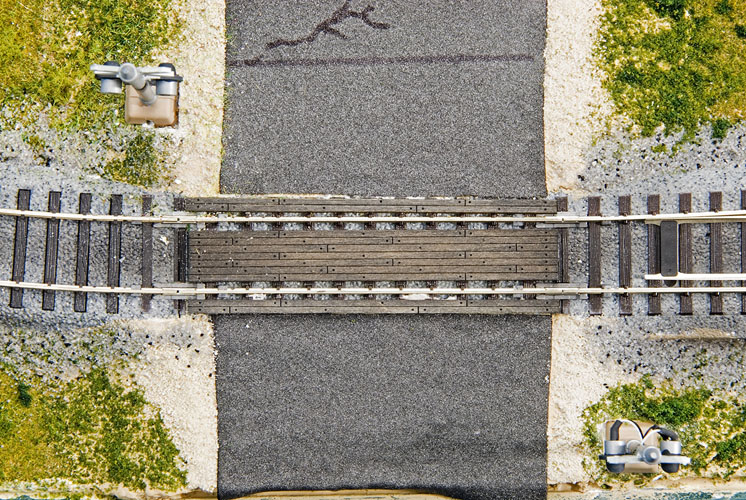
We finished up this portion of the project by detailing the road. First, we used black felt-tip permanent markers to add expansion lines and cracks to the road material. Next, we used Highball Products limestone ballast to add shoulders to the road. Any scenery work done near the foam road material must be done with care, as we soon discovered that matte medium will stain the surface. We were able to hide most of the stained foam by airbrushing the road with Polly Scale Union Pacific Dark Gray. However, we left a few of the smaller stains so the road would look weathered.
Finally, I used medium-viscosity cyanoacrylate adhesive (CA) to attach Blair Line wood grade crossings to the Unitrack. It’s good practice to test fit the grade crossings first to make sure flanges will roll through freely. As a final touch, I applied a wash of Polly Scale Steam Power Black over the grade crossing planks so they’d look like they’ve been in place for a while.
With that, the motorists in Black River will be able to get around town with no problem at all. – Cody Grivno
Black River
Of all the scenery projects, modeling the Black River took the longest – four days to be exact. To stay on our five-day building schedule, beginning on Tuesday that week, I started each day working on the river’s next step. I’d then move on to something else while that layer of the river dried. But don’t let that daunt you. Despite the fact that model railroad water features look impressive, they’re very easy to make.
I started by cutting out the foam scenery where the Black River would run, cutting all the way down to the plywood top. Then, using a sharp utility knife, I made angled cuts to form the banks. Next, I smoothed the rough edges with a medium-grit sanding block. I then covered the banks with Sculptamold to give them the look of eroded soil.
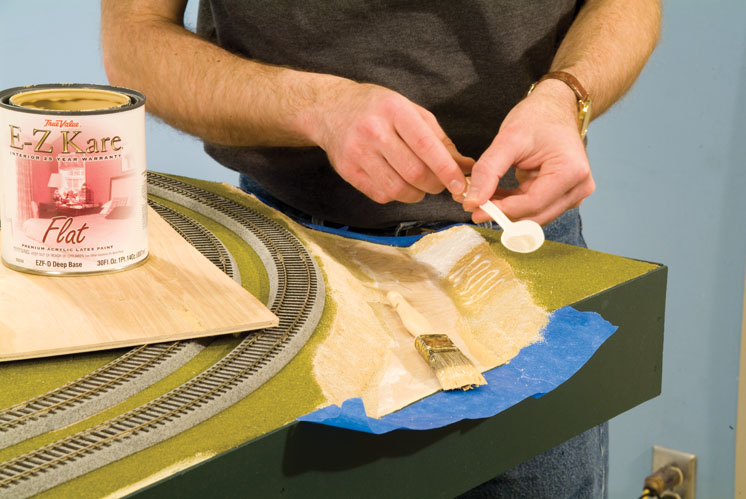
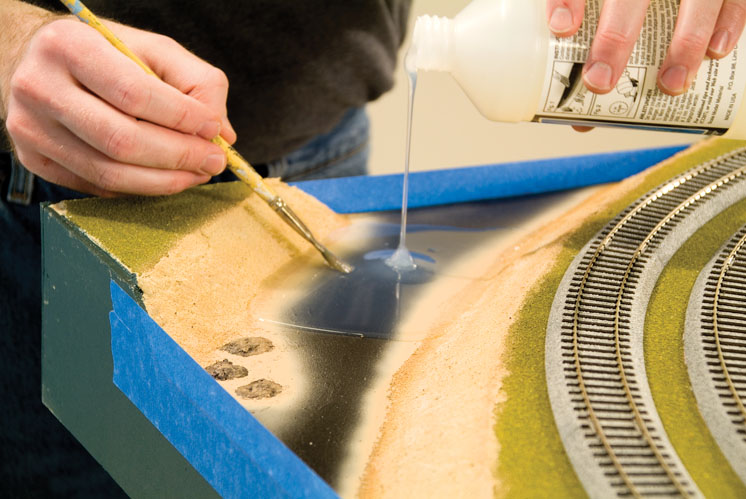
Once the Sculptamold had dried, I painted the banks with tan latex house paint. Much like building the hills on page 53, I coated the wet paint with white glue, as shown in the top photo. I mixed the two together on the surface with a wet paintbrush. I then sifted some Highball limestone ballast into the paint-and-glue mixture to represent sand and clay. Once the ballast had a few hours to dry, I vacuumed off any loose material.
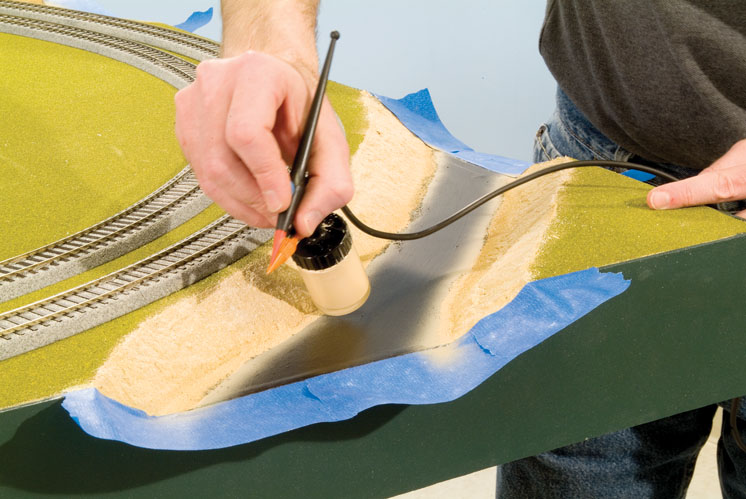
I painted the bottom of the riverbed with flat black latex paint. (It’s the Black River after all.) The black paint allows the resin layers to reflect light like a mirror. Next, I airbrushed the banks with Polly Scale Sand, which was a close color match to the limestone ballast we’d used on the banks. Similar to the technique I used on the Lake Beulah renovation project in the February 2007 installment of “Scenery Step by Step,” I feathered the tan paint into the black riverbed to create the illusion of depth.
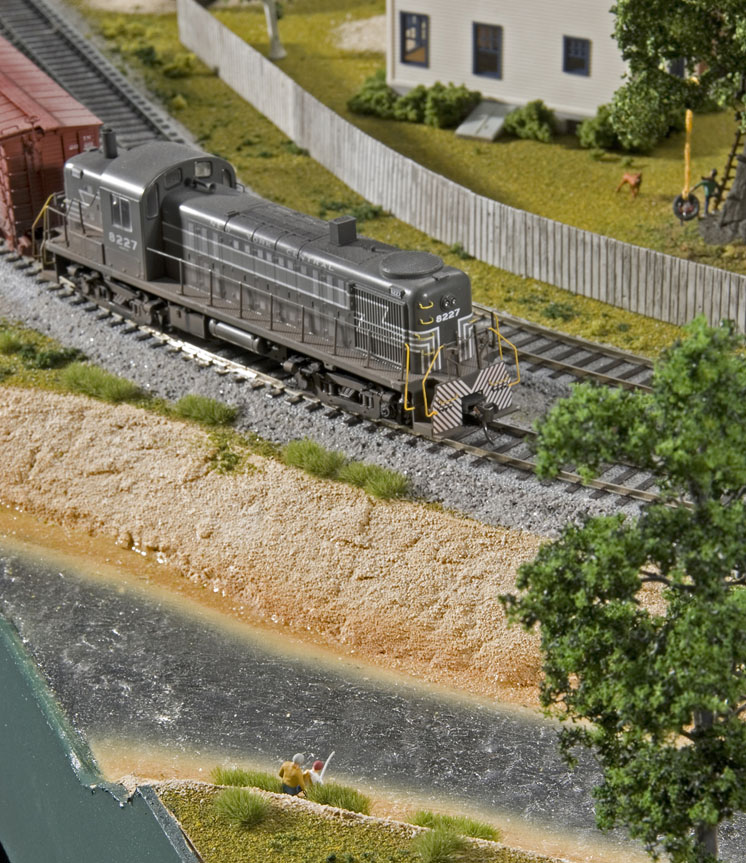
Once the paint had dried, I dammed both ends of the river with masking tape and poured the first layer of resin water. As shown in the bottom photo, I used Woodland Scenics Realistic Water. This is no-odor, no-mixing resin. You can pour the material in 1⁄8″ layers, and it sets up in about 24 hours. To give the Black River a little extra depth, I poured two layers.
After the resin had a full day to dry, the next step was to add the waves. For this, I used Woodland Scenics Wave Effects paste. The material goes on white but dries clear. I used a paintbrush to form the paste into ripples. To finish things up, I added some Scenic Express Prairie Tufts to the banks, and associate editor Dana Kawala placed a few people fishing along the shore. – D.P.
Sound
Want to draw more attention to your scenery? Try adding sound effects to it. A number of suppliers offer sound effects systems, some of which are quite sophisticated. An easy start, however, is to use self-contained sound modules. These typically play one sound and are compact and easy to install. For the river scene on our Black River Junction layout, I used a ScaleSound II running-water module from Miller Models (www.millermodels.com).
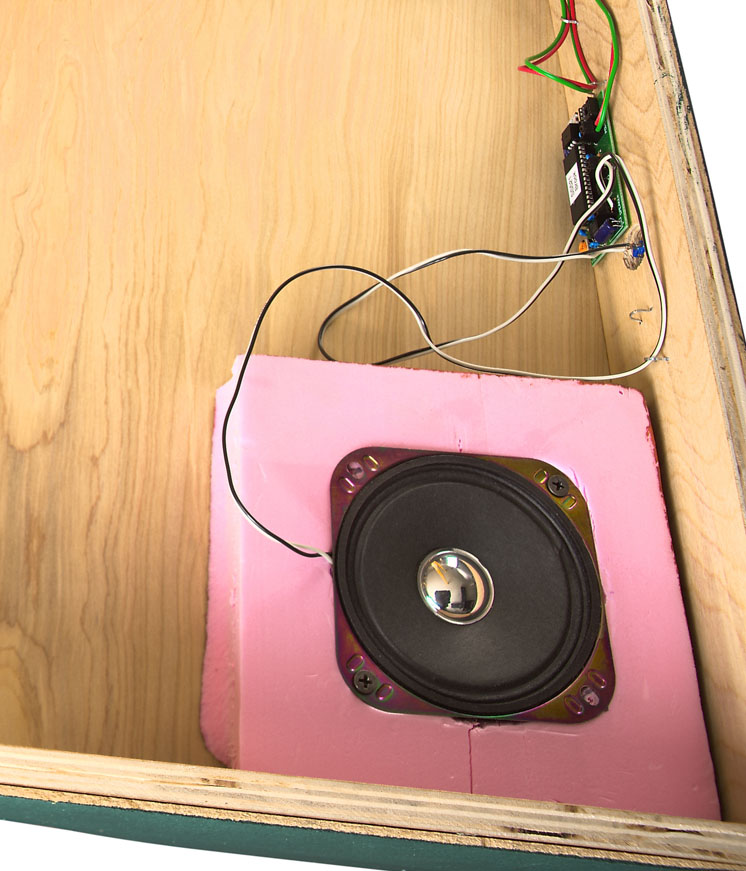
The ScaleSound II module features screw-terminal connections, runs off a 9-volt power supply, and can drive a 2″ or 4″ 8-ohm speaker. I mounted one under the river end of the layout, as shown in the photo. Following the directions, I wired the module to be turned on and off with a single-pole single-throw (SPST) toggle switch.
I bought a 2″ and a 4″ speaker for the module and tried them both. The 4″ speaker had much better quality, so that’s the one I used. Speakers sound better if they’re mounted in air-tight enclosures, so I made a simple one for our speaker from a piece of 2″ foam insulation board. I sealed the speaker to the foam with latex caulk and screwed the assembly under the layout.
With the addition of the sound module, the Black River on our layout not only looks good, it sounds good too. – D.P.


