


Having trouble viewing this video? Please visit our Video FAQ page
Compact tabletop model railroading comes to MRVP in a big way! In this first of two videos, David Popp shows how to assemble a standard 12 x 14-inch T-Trak module. A Dream Team of Kalmbach staffers and contributors will then develop unique scenes on these N scale modules — all as part of MRVP’s first-ever group project. Be sure to follow all of the fun and frivolity on MR’s Facebook page and in subsequent MRVP videos!


I was fascinated by the T-Trak concept and your videos. Please consider doing the same for HO, perhaps 2 foot square.. A video or article with specs would be appreciated. At shows I see little standardization of layout modules and this could help HO enthusiasts to build smaller modules to get started.
Just watched this video for the first time. I found it interesting how the box was constructed. The first thing I thought of when I watched David building the box was a Fast Tracks Freight Crate. He uses the same material for them except everything is laser cut and the edges have “fingers” to join them. It’s a shame that nobody builds boxes that way for T-Trak. For those of you who do not know what I am talking about you can go to https://www.youtube.com/watch?v=v1em-XAqKLs and you can see the him building one of the freight crates. The T-Trak module is just a bit larger than a freight crate. With a laser cutter, and using Masonite, building that initial T-Trak box would be relatively easy as the laser would do much of the work. The finger joints would give you a tighter surface to hold glue when you put them together. You don’t even need clamps if you don’t have them available. I have built several freight crates myself. Once you have the sides glued to the top/bottom and then glued to the next side, they hold together quite well and tightly. The finger joints also provide plenty of gluing surface.
Bill
Video tutorials are useful, and MR’s are professional produced. Yet, [and this is meant as constructive criticism] I found the sheer expense of tools used, relative to the simple goal of what was being constructed, to be discouraging. I DO have a drill press, table saw, clamps, and many other power tools, but as a *promotional* video, meant to attract a wide audience, I think it implies that too great an investment is needed to pursue our hobby, even for small modules. For example, showing the use of a backing board is an important concept, but a simple hand-held drill would work as well, given the thickness of the material and precision needed
So this sample video does not inspire me to subscribe to Video Plus. I have to assume from its example that other videos will be produced in similar fashion, and unless I have a full machine shop, wood shop, paint shop, model shop, etc., the techniques illustrated will not likely to be of much benefit to me.
Great video…a fun project for sure. How about using an air nailer instead of, or in conjunction the glue. I would imagine those that have a drill press, might have at least a $20.00 air nailer. No waiting for glue to dry…on to the next step.
Great video, enjoyed reading some of the other comments.
The only thing missing was Bob Vila. The best thing, so far, other than the zapatos azules, is the demonstration that model railroading isn't just about trains and track. The hobby has so many other facets, skills, tools, (and clamps) required to do the job. There's always another thing to learn and another way to do it. GO METRIC!
I am enjoying theT-Trak series and look forward to seeing the creativity of the participants on the individual modules.
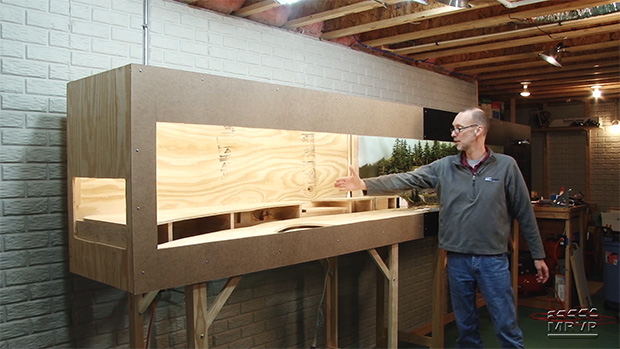
Your construction of the T-Trak modules is different (not saying it is wrong) from the plan shown on the t-trak wiki. The module shown on the wiki puts the "base plate" on the top of the module. This allows for the placement of track wiring, DCC panels, module animation lights, sound speakers and/or motors, to be placed below the 12" x 14" "top" piece of the module, leaving the underside hollow.
One question: What was the size of the bit that you used in the pin vise to drill out the plastic for the nails?
Other points: an easy way to separate two modules is to place a small flat blade screwdriver in the gap between the ends of the two sections of track (overhanging the module) and between the two modules with a slight twisting motion. The modules will pop apart easily.
Our club prefers to use small screws ("K" screws – from Trainsaida {http://www.trainaidsa.com}) to hold down the track rather than nails. They found found that the continual moving/set-up/tear-down of the modules over time caused the nails to work loose and the track to out of alignment.
If you had used 3/4" thick side material, the assembly process would have been 10 times faster and much stronger.
Yes folks,only three countries in the world not using metrics.Liberia,Myanmar and the USofA.
Very interesting and a first for me. Thanks for doing this.
Interesting project and great idea to get the staff involved. I'm sure they are not all model railroaders. I have one other comment, and that is the continued use of inches, feet measurement instead of metric. I grew up in Canada with inches and feet, but because Canada adopted metric in my 20's, I can measure in both.
I prefer metric. I recently moved from Canada to Netherlands for work. Here in Europe my new modular HOm railway is all metric. Its easier to add, subtract multiply and divide. Your new project is a great chance to try out metric and get your viewers in sync with the rest of the world. Come on USA, measure up to the rest of the world.
David
Brunssum, NL
I'm glad to see you doing the T-trak modules. Chris made some comments awhile back that T-trak looked like something she could do. Rather than start from scratch, as you are, in assembling the boxes, I bought her some module kits from T-kits, http://t-kits.com/catalog/1. She was easily able to assemble the kits by herself. The track went down accurately and her two modules snap together easily. So for those without a shop, or without twelve clamps, the kits offer an easy alternative.
I'm looking forward to seeing what various folks put on their modules. Chris has stalled for a bit as she wants to build Settle Station in England. She's picked a challenge! http://www.visitcumbria.com/carlset/settle-station/ Lots of scratch building.
This is going to be a fun series to watch.
David
Hi David, the general rule at boat shops is that you are usually one clamp shy of what you need. The number of clamps "could" be reduced by careful use of a good quality web clamp with corner guards. You'd need to use the same care in clamp set up as you demonstrated.
Thanks for mentioning the slight warping, and inaccuracies that always plague shop work!
Was neat to see some of these at Trainfest. Helpful technique for the backboard when drilling. Look forward to the remaining videos to see it all come together.
Allan
thanks David I'm going to build one of these I have a nephew he comes over all the time.