


Many model railroaders get their start during the holiday season, with a train set either wrapped in colorful paper or already set up and circling under the tree on Christmas morning. But after a while, even a starry-eyed kid can get bored watching that train go around and around in an endless loop. It would be a shame for that first set to go to waste when that youngster decides to go from a train set to a layout.
So let’s see how that simple loop of train set track can be expanded into a 4×8-foot starter layout with interesting operating opportunities.
For my starting point I chose Bachmann Trains’ HO scale Rail Chief set. I picked it because it’s a middle-of-the-road set with three freight cars (a gondola, a coal hopper, and a reefer car), and the manufacturer offers more track components of the same type for separate sale. The techniques I followed here should also work with train sets from other manufacturers like Wm. K. Walthers.
To be sure that my proposed track configurations would actually work with the track components available, I decided to do the track plan on the computer, using RailModeller Express for MacOS, the free-to-try version of RailModeller Pro. The free version lets you build track plans with up to 50 elements, which proved to be just enough for my proposed 4×8 layout. RailModeller Express comes with more than 270 libraries of track lines and layout elements in scales from Z to large scale, including narrow gauge track, structures, trees, vehicles, slot car pieces, and even Lego track.
And it was a good thing I used the computer to double-check my work, because some of the track configurations I wanted to try — like a curved passing track or a crossing between two facing turnouts — just weren’t possible with the Bachmann E-Z Track components on offer. I might have been able to do what I was thinking of with the nickel-silver E-Z Track with the gray roadbed, but the premise of my experiment required sticking with the black-roadbed-and-steel-rail track that comes with the set.
My goal was to upgrade the track that came with the train set to a layout with switches, spurs, and structures that could be serviced with the three freight cars that come in the train set. I also included a freight house and a team track area so the owner could add a boxcar or two to the mix.
I planned my expansion in two phases so the builder could space out his track purchases. Since the end curves move in each expansion, don’t nail or glue the track down to the train table until phase 2.
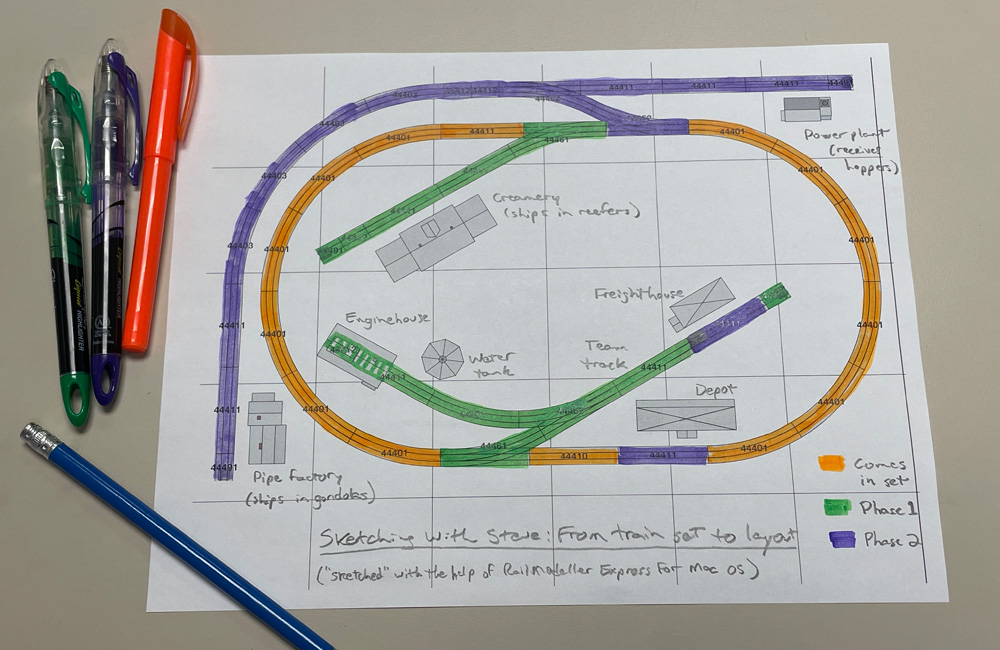
I used highlighters to color-code the track plan printout to make the different phases clear. Orange marks the original oval of track that comes with the set: twelve 30° segments of 18” radius curves (making a complete circle) and two 9” straight sections (one of them a terminal rerailer) to expand this into a 36” x 45” oval. (Bachmann’s website calls this a 47” x 38” oval, but that’s the outside dimension counting the built-in plastic roadbed; I’m talking about track centerlines.)
Phase 1 is marked in green. Here I add one left-hand turnout (part No. 44461) to the straightaway on each side, sending two spurs into the interior of the now-36” x 54” oval. On the top of the loop, the turnout leads to two 9” straight sections (No. 44411), a 3” section (No. 44412), and an end-of-track bumper (No. 44491) for a simple industry spur. This spur would be a natural place for a large industry. (The structures on this plan are generic ones that come in RailModeller, not specific kits.) I chose to call it a creamery, so we have a place to spot the reefer car. A brewery or produce packing plant would serve the same purpose.
On the bottom, a right-hand turnout (No. 44462) splits this route into a switchback, serving two spurs. One 18” curve section (No. 44401), two 9” straightaways, one 3” section, and a bumper complete these tracks. On the one to the left, I place a small enginehouse. I added a water tank purely for scenic interest, but since the train set comes with a diesel, it could be omitted. I put an engine house on this spur instead of another industry because at phase 1, the other spur is too short to serve as a switchback with a locomotive and a freight car.
The other spur leads to a freight house, which can ship or receive almost any kind of car (though a boxcar is the most likely). To fit inside the curve at this stage, I deferred adding a second straight section until the next phase.
Phase 2, marked in purple, adds another switchback leading to two more industries outside the oval. The through route of Bachmann’s E-Z Track turnout is 9” long, meaning it can be substituted for a 9” straight section of track. So when I insert a right-hand turnout at the top of the loop, I need to add another 9” section to the bottom to fill in the gap. The loop is now 63” wide. Though another turnout would fit there, its spur would make the overall layout too wide for a 4 x 8 tabletop.
For the bend around the end of the loop, I used four 22.5°, 22” radius curve sections (No. 44403). The rest is made up of five 9” straights, two 3” segments, and two bumpers. For the industries on these spurs, I chose a pipe factory to fill empty gondolas (a tie mill would also serve) and a small power plant to receive coal in hoppers. I also add another straight segment to extend the freight house spur at this stage, providing a car spot to serve as a team track.
The most glaring omission from this track plan is a passing track. A train that needs to work a facing-point spur would have to run around the car all the way around the loop.
Though the plan as drawn is a fine self-contained 4×8 HO scale plan, someone with even more expansion in mind could remove the pipe factory and turn that track into a connection to a larger main line or an interchange with an outside railroad. This track plan’s journey from train set to a layout has just begun.
For more of my track plans and other how-to content, check out the “Build a Model Railroad” section of our website.


I find it ironic that in planning a beginner’s layout, you made one of the most common beginner’s mistakes. Note the double S curve in the top right of the plan. A train comes directly out of a sharp 18″ radius turn, into a switch curving the opposite direction at the same 18″ radius, then into ANOTHER switch yet again curved the opposite way. Configurations like this are a known source of derailments, and have been warned against in track planning books. The problem is this: on curves the ends of the cars swing out, and on an S curve they swing in opposite directions causing them to offset. If this offset exceeds the ability of the couplers to pivot to compensate you have a derailment. This is especially true with rolling stock with body mounted couplers such as those in the Bachmann set used here. Obviously, the longer the cars the worse the problem becomes.
Fortunately, the solution is simple. The layout you designed for a 4×8 acrually fits in a 4×6 with plenty of room. This allows us to add straight track sections between the curves to lessen or even eliminate the S curve problem.
On the mainline, you can add a 9″ straight between the curve and the crossover switch. you’d also need to add a similar section to the bottom of the plan. This brings the overall size of the plan closer to the 4×8 dimension, but still leaves plenty of room on the ends. The crossover itself is a little more tricky. It is recommended that the straight between the S curves be at least as long as the longers car to operate over it. In this case, the 50 foot reefer is about 6 1/2″ and you don’t have that much room without putting the track close to the edge of the layout. But anything helps, and using the steel EZ track called for in the plan you could insert a 3″ straight or two 2″ ones between the switches and at least lessen the impact of that S curve.